Audience triggers
How Exit Intent Works and How to Show an Exit Popup
★☆☆ Technical level 1 of 3
Written by Neil Webley · Last updated
Learn how exit intent works, how to show a popup when somebody leaves your site, and how to test desktop and mobile triggers with FreeCROTool.
How do exit intents work?
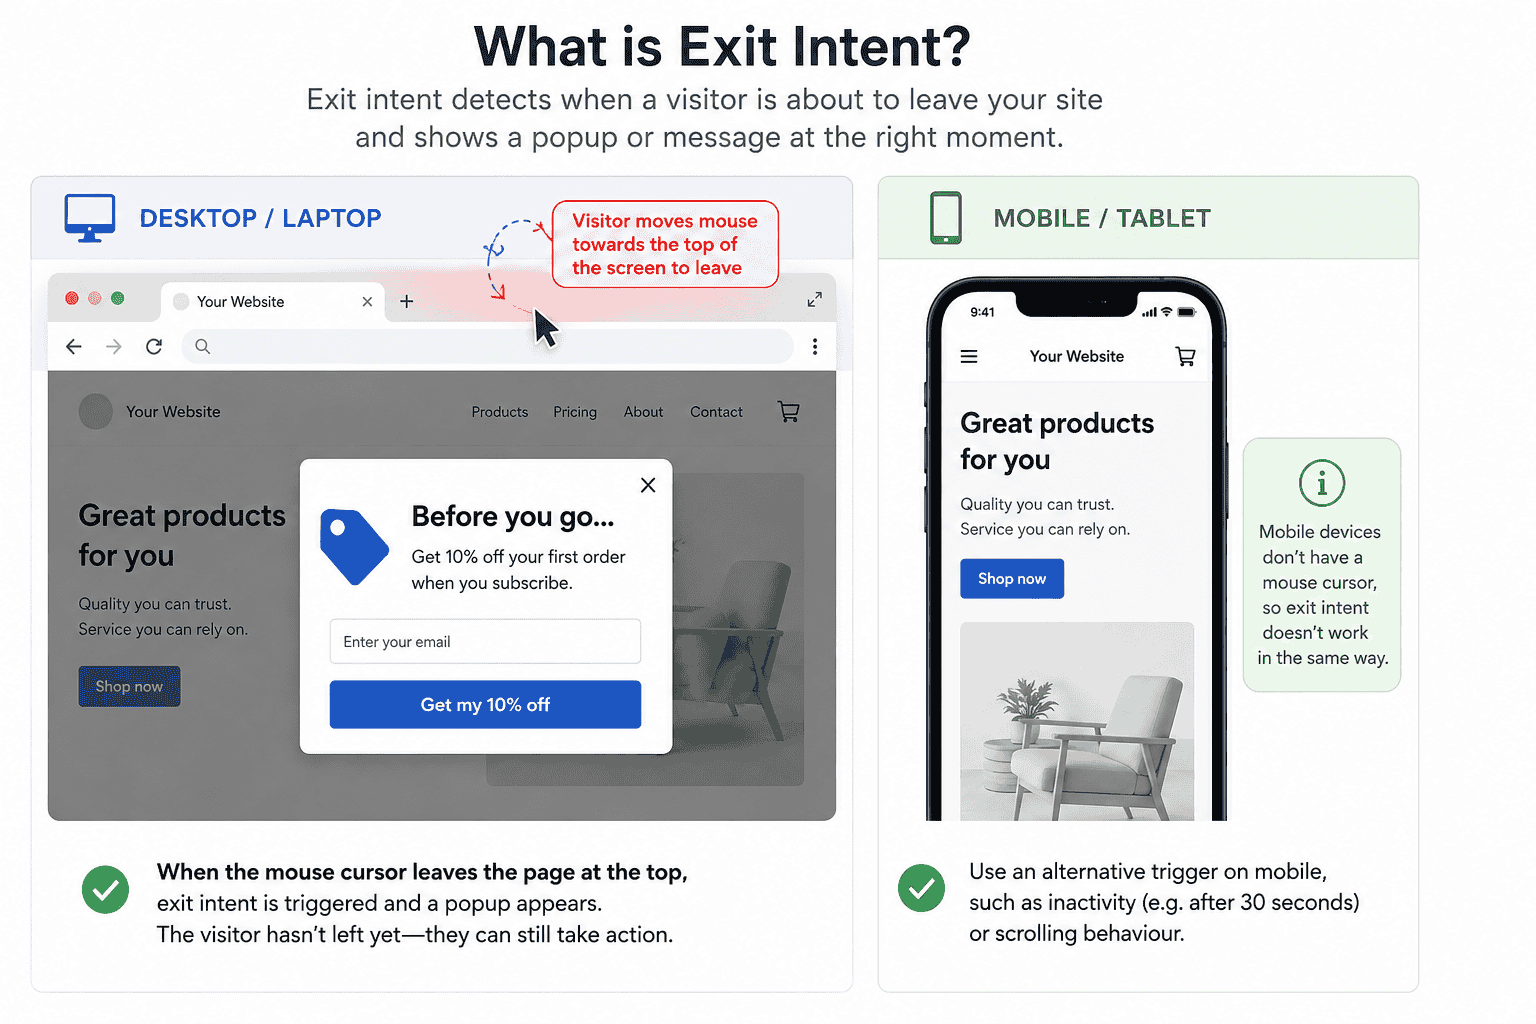
Exit-intent technology watches for behaviour that suggests a visitor may be about to leave a web page. On a desktop or laptop, the clearest signal is the mouse pointer moving quickly towards the top of the screen. That is where a visitor would normally go to close the tab, open another tab, type a new address or use the browser's Back button.
When the pointer leaves the page near the top of the browser window, the website can respond by displaying an exit-intent popup, overlay, message or other page change. The visitor has not definitely decided to leave: exit intent is a useful behavioural signal, not proof. A visitor might simply be moving the pointer to a browser control.
Exit intent is therefore primarily a desktop feature. Phones and most tablets do not have a continuously moving mouse pointer, so a website cannot detect the same movement towards the top of the screen. Claims of “mobile exit intent” normally refer to a different signal, such as inactivity, scrolling upwards or pressing the Back button.
How do I show a popup when somebody leaves my site?
You need two parts: a trigger that detects exit intent and a popup or overlay that is initially hidden. When the trigger fires, your site reveals the overlay. The popup should offer something genuinely useful at that moment. For example, it could provide delivery information, help with a form, a reminder that progress can be saved or an answer to a common concern.
A good exit popup has one clear purpose, a prominent close button and an accessible way to dismiss it with the keyboard. It should not appear immediately, obscure required consent controls or repeatedly interrupt the same visitor. Avoid treating every exit as a request for a discount; the right message depends on why people abandon that particular page.
Choose the right page and message
- Use analytics, surveys or user research to identify pages where visitors hesitate or abandon a journey.
- Match the message to the page. Checkout reassurance should be different from help offered on a long application form.
- Keep the call to action specific and make closing the popup as easy as opening it.
- Limit how often it appears, especially if the visitor dismisses it.
- Measure the completed conversion, not only clicks inside the popup.
When should I use exit intent?
Exit intent works best when there is a useful intervention you can make before somebody leaves. For example, an ecommerce site might answer delivery or returns questions, a lead-generation site might offer help completing a form, and a content site might suggest a related guide or newsletter.
A useful exit-intent message should reduce uncertainty or help the visitor take a sensible next step. It should be relevant to the page they are leaving and provide information or assistance that was not already clear.
Avoid showing an exit popup simply because somebody is leaving. Start with a reason why visitors may be abandoning the page and design the message around that problem. If you are unsure which message works best, test the alternatives against your existing experience.
How does exit intent work on mobile?
Traditional exit intent does not work reliably on a touchscreen because there is no pointer to track. A practical mobile alternative is to offer help after a period with no interaction. For example, a popup could appear after about 30 seconds of inactivity. Treat 30 seconds as a starting point rather than a universal rule: a visitor may be reading, comparing details or finding payment information rather than struggling. Read the separate guide to triggering a test after visitor inactivity for setup, timing and measurement guidance.
An inactivity timer should reset when the visitor clicks, taps, scrolls, types or moves the pointer. Review real journey data to choose an appropriate delay, then check that the prompt helps rather than interrupts. On mobile, a small panel or inline message may also be less intrusive than a full-screen overlay.
Full walkthrough video
Watch the complete walkthrough to see how to configure the trigger and use it to display an overlay.
Set up an exit-intent popup in FreeCROTool
Exit intent is built into FreeCROTool as a test entry rule. Instead of writing your own pointer-detection JavaScript, you choose the built-in desktop exit-intent audience and use the selected test variant to show your popup or overlay.
- Create the popup or overlay on the page and keep it hidden in its initial state.
- Create or open the test that will reveal it.
- Choose the pages where the test is allowed to run.
- Select the built-in Desktop Browsers - Exit Intent audience. Its rules restrict the audience to desktop browsers and wait for Exit Intent.
- In each variant, add the change that reveals the appropriate version of the overlay.
- Set the test to Staging, publish the workspace and test every variant before making it live.
Keeping the page targeting, audience trigger and variant changes separate makes the setup easier to understand: the location controls where the test can run, the entry rule controls when a visitor enters, and the variant controls what they see.
Use inactivityPeriod for mobile visitors
For a mobile alternative, create a mobile audience and add the inactivityPeriod test entry rule. Enter the delay in seconds, such as 30, and use that audience for the mobile version of the test. FreeCROTool resets the inactivity timer when it detects clicks, scrolling, touches, key presses or mouse movement.
Keep desktop exit intent and mobile inactivity in separate audiences when their rules, layout or message need to differ. This also makes quality assurance and reporting easier to interpret.
Prevent the test from triggering again too soon
An exit-intent popup can quickly become frustrating if it reappears every time the visitor moves towards the browser controls. FreeCROTool has a test-level cooldown setting that temporarily stops the test from being evaluated again after a visitor enters it.
This setting is not specific to exit-intent tests. You can use it with any FreeCROTool test when the experience should not be shown again immediately, including tests triggered by inactivity or other audience rules.
Set the cooldown period
- Open the test.
- Go to Settings, then Details.
- Select the Do not show this test again for checkbox.
- Enter a positive number and select Minutes.
- Save the test and publish the Workspace when you are ready for the change to affect visitors.
Do not show this test again for [number] Minutes
After a visitor enters this test, FreeCROTool will skip evaluating it until this time has passed.
The cooldown begins when the visitor enters the test, rather than when they close the popup. During the selected period, FreeCROTool does not evaluate that test's location or audience entry rules again, so it does not reapply the test transforms, including page changes, popups or other variant experiences. When the time has passed, the test becomes eligible for evaluation again and will only run if its normal test conditions are met.
The cooldown does not stop page-visit tracking. After a visitor has entered the test and been assigned to the control or a variant, FreeCROTool continues tracking the configured pages they visit. The visitor may still be influenced by the experience they previously saw, even while its transforms are temporarily suppressed, so retaining that journey data is valuable for measuring the test accurately.
Choose a duration that matches how disruptive the experience is and how often visitors normally return to the journey. A short delay may be suitable while testing a subtle message; a more intrusive overlay usually needs a longer break. Remember that the setting applies to the whole test, so the cooldown covers the control and every popup variant in that test.
Test which popup message improves conversion
FreeCROTool can run multiple versions of the popup as variants in the same A/B test. One version might answer a delivery concern, another might offer live help, while the control keeps the existing experience. Traffic is split between the versions so you can compare how each message affects the conversion rate.
Define the primary conversion before launch and keep unrelated changes out of the test. A higher popup click-through rate does not necessarily mean more completed purchases, enquiries or registrations. Use the final business outcome to decide whether a message helped.
Before publishing
- Test the control and every variant in Staging.
- Confirm the overlay appears only on matching pages and after the intended trigger.
- Move the desktop pointer out through the top of the viewport and verify the popup appears once.
- Enable the cooldown where appropriate and verify the test is not evaluated again before the configured number of minutes has passed.
- Check the close button, Escape key, focus order, screen-reader labels and background scrolling.
- On mobile, verify activity resets the inactivity timer and the popup fits the available screen.
- Confirm impression and conversion tracking before starting the experiment.